|
If you're reading this the traditional purpose of AA should be clear to you: to remove and/or reduce the aliasing that is inherent in computer generated images. Those familiar with LightWave however are aware that AA is also used to achieve certain effects, such as motion blur and depth of field. This is still the case, but, since 9.2, in a different way than you were used to. Also, what was previously not the case but is now, and is very powerful, is that the new AA influences the amount of samples used in all sample-driven processes, also called stochastic or noise, for example the new blurred reflection, the material nodes, the SSS, Monte Carlo radiosity and so on. Also, 9.2 introduces a new and very powerful feature that takes the name of its predecessor, Adaptive Sampling. Where this used to be a bit of a mongrel, the AS system is now one of the most powerful and useful tools in the AA set.
Most of this guide is meant for any of the new cameras, and not the classic camera. Although some settings are available for the classic camera as well, the way Classic works is pretty much the same as it used to be. The idea seems to be to phase out the classic camera once all its functionality is present in the new camera system, so I won't spend too much time on that. For those unfamiliar with the difference between the systems, it's suffice to say that the classic camera doesn't offer any of the new features introduced in 9.0 and onwards concerning cameras, but that edge rendering and 1 & 2 point poly's are only available in the classic camera for now. The perspective camera is a full raytracer, and is often, for complex scenes mostly, several orders faster than the classic camera. The classic camera is usually faster when several layers of transparency are present, and for simple scenes with few polygons and expensive transparency operations. |
AA & Motion Blur
Img.1 click for enlargement |
|
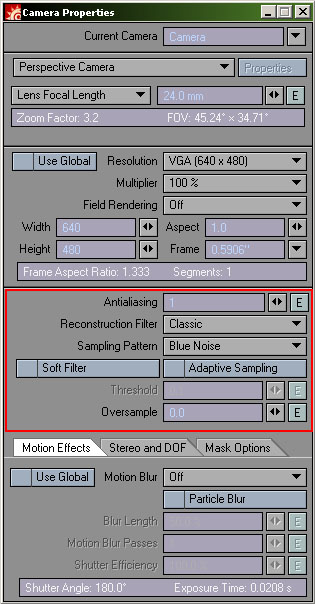
On the right you see a screen grab of the LW 9.2 camera panel, set to perspective camera. The section that controls AA is outlined in red. Some of these controls are duplicated in the render globals settings. There are fewer controls there, but the ones that are have the same function as they do here, so I won't treat them seperately. First, a description of each function, then we'll go on and see how they can be useful to us.
Antialiasing:
This setting replaces the older drop down menu for PLD and classic AA methods. The number indicated here is the base-level AA that your scene will receive. AA set to 1 will give you PLD-1 AA, which means a little bit of AA for free, but not much. The new AA system is completely different than the old AA system, and therefore one can achieve much better results with much lower AA effort. The new AA setting is not directly comparable with the old amount of passes. Still, if you'd like to make a rough comparison in terms of passes versus samples it'd be as follows:
| Old AA |
New AA |
| |
|
| Low / Enh. Low |
5 |
| Medium / Enh. Med |
9 |
| High / Enh. High |
17 |
| Extreme / Enh. Extreme |
33 |
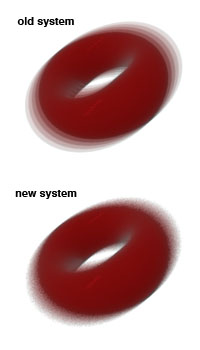
The new system doesn't use passes at all (whee!), and does all the AA in a single swoop, which is often faster as it saves preprocessing and transforming time. Using a base-AA level of 33 is often completely unnecessary, where one used to use Extreme AA in the old system. Also, the new AA uses stochastic sampling, instead of the discreet layers the old AA did, which delivers noise rather than banding, which is often preferred (see img.1). If you want passes anyway for a particular purpose, you can force the system into doing separate passes by setting the motion blur to classic, and setting the amount of passes equal to the AA you'd like, setting the Antialiasing level to 1.
Reconstruction Filter:
This setting controls how the individual samples are added together to form the final pixel. This can have some influence on the look of the final image. Usually Box is the standard choice, but classic is a fine general purpose filter as well. Usually I choose Classic when the sampling pattern is also set to Classic and adaptive sampling is off, this results in a very nice Cone filter. If AS is used, then the sampling pattern must be something else than classic, and I usually choose Box.
Mitchell is a favorite among many, for the slightly edgy-er look, and Lanczos is very sharp, mostly suited for cel-shading. Gaussian is a soft filter. Each filter has a soft and sharp setting, which modifies the filter a bit to your choosing. There are other tutorials that go into great detail about this filter.
Choosing the right filter means having the right look for your image, but also might mean you can get away with less AA for your particular scene. Avoid using Classic when the Adaptive sampling system is on. They don't work well together. Use Box instead for almost the same look.
|
 Img. 2 Camera Panel Img. 2 Camera Panel |
Sampling Pattern:
The sampling pattern determines how the AA samples for each pixel are distributed.
| Pattern |
Description |
| Classic |
This is the default mode, for backward compatibility reasons. This is a very good sampling pattern, which has a very efficient distribution of samples. However, it has not been designed to work with Adaptive Sampling and should be avoided if AS is used. This can cause poor AA results and long AS refinement times. |
| Fixed |
This is a fixed grid-like pattern that works best when fine grid-like patterns or fine lines are present in the scene. Also, for low AA settings this produces a more consistent result than Blue Noise. When more than 64 samples are used either by a very high base-aa setting or by using adaptive Sampling this mode automatically switches to blue noise for the additional samples. This mode is advised when using Adaptive sampling. |
| Blue Noise |
Blue noise randomly distributes the AA samples. For higher AA levels this gives a very nice film-like noise distibution on irregularities. |
Soft Filter:
A post-processing filter that will soften the end-result. I've never used it. It seems to be analogous but stronger than using a (soft) variety of reconstruction filter.
Adaptive Sampling:
Turns on the AS system, regulated by the Threshold setting. The AS system is very different from the old AS system in 9.0 and before. What this system does is, after the image has been rendered using the base-AA, is analyse it and mark all pixels that have a contrast level with neighboring pixels beyond the Threshold setting, and refines these subsequently. It then analyses the image again, and keeps adding samples until the maximum number of samples is reached, or until there are no more pixels over the threshold. Read more about AS in the next section.
Threshold:
The contrast threshold for the AS system
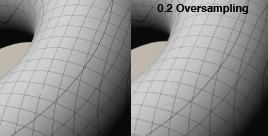
Oversampling:
This is an interesting one. It was added after many user requests to have the AA behave more like the old AA, which had this nice softish and forgiving quality to it. The new AA tended to be very harsh and needed much more samples to get nice smooth edges. In comes oversampling. In a way you can say that oversampling makes the sampling of AA extend beyond the boundary of the pixel it's supposed to sample by the amount of pixels set here. The old AA system had an oversampling of roughly equivalent from 0.25 to 0.5 hardwired, but now you can set this yourself. Setting a certain amount of oversampling will slightly soften the edges of your sampled pixels, which makes it more forgiving, making less samples necessary. Setting this too high causes blurring and artefacting. I usually stick to something between 0.05 and 0.2. |
|
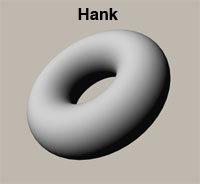
Let's use an example to explain this system. I will use a Donut that I will call Hank. Hank the Donut. If we render Hank with just a base AA, every pixel of Hank will be resampled the amount of times we set the base-AA. However, when we take a closer look at Hank, we might realise that it's unneccesary to sample most of the pixels of him, because they're smooth and happy the way they are, un AA'd. Only the edges of Hank need to be AA'd. So, this is where AS comes in. You can set the base AA really low, and the AS system will detect the pixels that have high contrast with their neighbours (according to the threshold setting in the AA panel), which means that they will likely need more AA. It then resamples only these pixels again, at a higher AA number. It then does this process again with even more AA samples until the maximum number of samples is reached (as stated in the chart below), or until all samples are within the threshold. See the examples on the right, where a difference in the tolerance number is indicated by white, which are the areas of the image that will be resampled.
The amount of AS passes and the maximum number of samples are governed by the following charts:
AA Level |
Max AS Passes |
Max Samples |
|
|
|
1 |
7 Passes |
128 |
2 |
|
256 |
| 3 |
|
384 |
| 4 |
6 Passes |
256 |
| 5 |
|
320 |
| 6 |
|
384 |
| 7 |
|
448 |
| 8 |
5 Passes |
256 |
| 9 |
|
288 |
| 10 |
|
320 |
| 11 |
|
352 |
| 12 |
|
384 |
| 13 |
|
416 |
| 14 |
|
448 |
| 15 |
|
480 |
| 16 |
4 Passes |
256 |
| 17 |
|
272 |
| 18 |
|
288 |
| 19 |
|
304 |
| 20 |
|
320 |
| 21 |
|
336 |
| 22 |
|
352 |
| 23 |
|
368 |
| 24 |
|
384 |
| 25 |
|
400 |
| 26 |
|
416 |
| 27 |
|
432 |
| 28 |
|
448 |
| 29 |
|
464 |
| 30 |
|
480 |
| 31 |
|
496 |
| 32 |
3 Passes |
256 |
| 33 |
|
264 |
| 34 |
|
272 |
| 35 |
|
280 |
| 36 |
|
288 |
| 37 |
|
296 |
| 38 |
|
304 |
| 39 |
|
312 |
| 40 |
|
320 |
| ... |
|
|
| 64-127 |
2 Passes |
|
| 128 & Up |
1 Pass |
|
| (I used Dave Jerrard's great Charts to compile this one ) |
|
|
As you can see, with each lesser pass, the maximum amount of samples drops down again to 256. This means that it's perfectly possible, and quite likely, that an AA of 8 combined with the AS system is actually faster than an AA of 7.
The AS system, however, is not perfect, as by very nature it cannot resample that which it cannot see from its primary data. It's therefore very important, and this is highly scene and purpose dependent, to give some thought to what your base-AA will be. In most cases, a base AA of 1 will not be sufficient. Small details and fine lines will not be picked up, and subsequently not be anti-aliased (see Hank with fine lines below). For animations this can give very bad results, flickering in and out of detials, banding, or 'walking' lines. Some experimentation per scene is required, but if in doubt, choose the higher AA. It is for instance smarter to use a base-AA of 4 than a base AA of 3, as it gives you an AS-jump, reducing the maximum number of samples, which can lead to shorter render times, and also reduces the chance of the AS system 'missing out'. This is all really scene dependent, and making generalisations is dangerous, but using this chart to your advantage might well save you those precious few hours of render time.
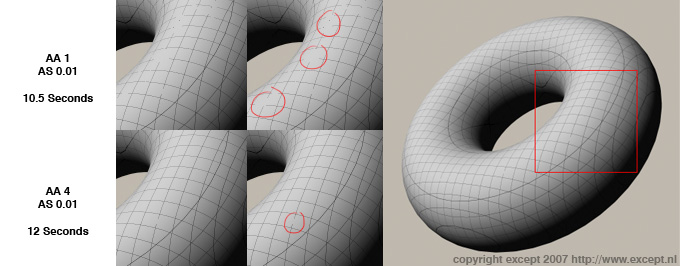
As you can see in the image above, when we give Hank some really fine lines on his gorgeously curvaceous body, the AS system misses them if the base-AA is set too low. In this case, a base-AA of 4 is even too low to catch all of the lines. It's better to go to 5 or higher if this is reall important. However, we can also increase the oversampling. This will spread the sampling pattern and cause the lines to be detected with a lower base-AA, at the price of some softness (see image below). But you might actually like that.
When do I use Adaptive Sampling, and when do I not?
Adaptive sampling is a great method to have consistent output quality while scene content changes, that focuses on important areas and not on others. That said, there are cases where you do not want to use it. First, since there is no 'max samples' setting, on scenes that have many sample areas, or contrasty surfaces that are expensive in calculation time, you want to watch out as your render time may become very high unnecessarily. Usually it helps to reduce the AS setting while increasing the base AA in such circumstances.
You do not want to use AS if you are re-exposing your image a lot after rendering. The AS system works on the gamma that LW renders in, so after re-exposing things may become aliased again. For linear workflow and similar techniques it's therefore recommended to turn AS off alltogether. |
|
The following settings are e general fail-safe, that renders fast:
With AS:
AA: 4 (or 8~12 with fine lines)
Reconstruction Filter: Box
Sampling Pattern: Fixed
AS: On, 0.1 for draft, 0.05 for rough, 0.03 for nice, 0.01 for very nice
Oversampling: 0.6
Without AS:
AA: 6 (or 8~12 with fine lines)
Reconstruction Filter: Classic
Sampling Pattern: Classic
AS: Off
Oversampling: 0.6
To mimick the old camera's look:
AA: 5/9/17/33
Reconstruction Filter: Classic
Sampling Pattern: Classic
AS Off
Oversampling 0.25 |
If this tutorial proves especially handy for you, would like to support the creation of more of these tutorials and new developments, or would just like to express your thanks, you can make a donation by clicking on the following button, or alternatively just send me an email.
|
|