In this part of the tutorial we will use a Lightwave scene in version 5 format that I have made. With this scene we will set up the radiosity calculation in Lightscape, and prepare it to be exported to Lightwave again. I will explain the process step by step, although I won't go into much detail. The object of the tutorial is to get you started with Lightscape and give some helpfull hints on the way.
Download the scene in LW 5 Format here. (ZIP 1.3 Mb)
This scene contains free 3D objects downloaded from Ultra3D.com. Note that this tutorial and all files associated with it are property of Except, and may only be used in relation to self-teaching through this tutorial.
|
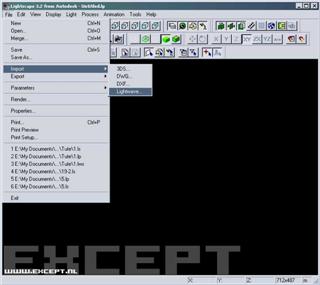
First thing we need to do is to start Lightscape and import the scene.
-> File -> Import -> Lightwave...
|
 |
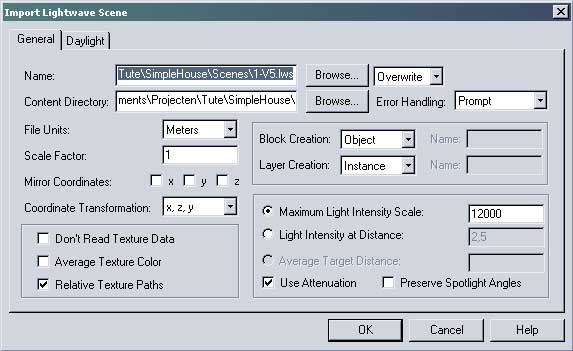
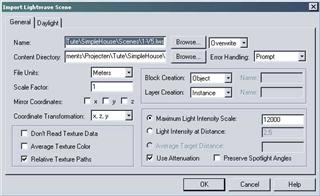
The following dialog box needs to be filled out. Usually the only things you enter here are the top two fields, with the scene file, and the content directory.
Once OK is pressed the solution is imported. Lightscape will ask you if the dimensions of the incomming model are about right. It is important to check whether this is so, and whether the dimensions are realistic. In Lightwave it doesnt matter how big or small your objects are, but in Lightscape it does matter. Model in real world realistic dimensions, it will look all the better for it.
! If Lightscape tells you no polygons were created because they are possibly too small, you have probably tried to import either a Lightwave V6+ scene, or the content directory structure is not working. Check whether all objects are in place, and in V5 format. With this scene, Lightscape will NEVER this say unless one of those two reasons is the case.
|
 |
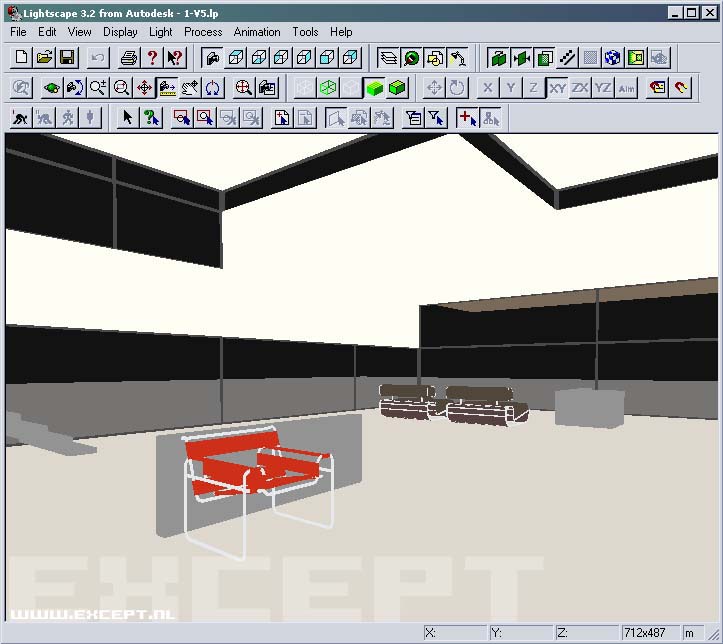
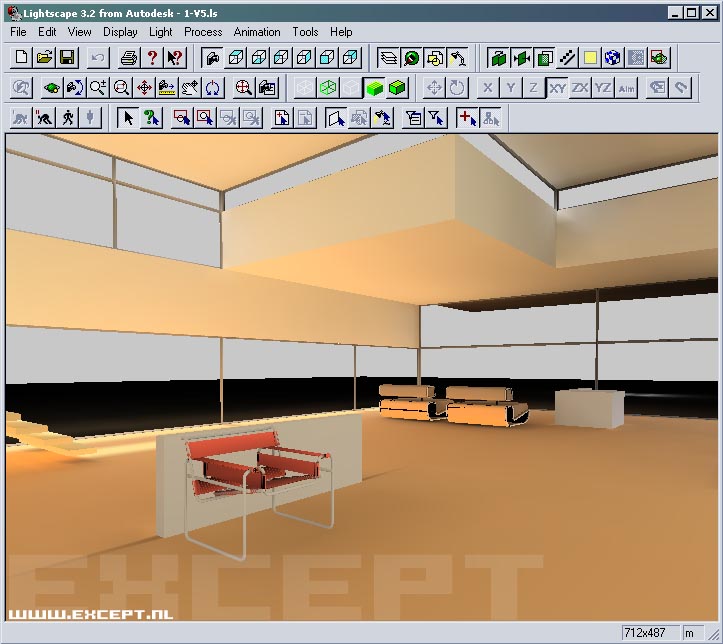
Now the scene is imported, try to move the camera around a bit, and set it up properly. It is often necessary to do this using the View Setup panel, as the camera controls can be ackward. Also, if parts of your model are cut off, adjust the near and far clip distances in your View Setup panel.
The scene should look something like this after moving the camera.
|
 |
Pretty Nice OpenGL shading eh? Indeed cutting edge 1992 technology. It's usefull to mention the OpenGL implementation of Lightscape here. Lightscape doesn't like you running other programs with OpenGL, at least, not unless they are minimized. The display can become incredibly slow, especially when you turn textures on. It is important to realise that when we start to calculate our solution, and you have a refresh rate of 2 seconds of the main view, your solution will calculate really slow. This is because lightscape waits for a screen refresh after each iteration. With commonly over 5000 iterations in a scene, this can slow things down a lot. When you notice your OpenGL performance being slow, make the screen size smaller, turn of textures etc. Occasionally while calculating I make the main view as small as possible. This can save enormous amounts of calculating time.
|
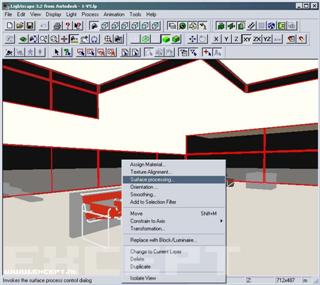
Now its time to do one of the most important steps in the preparation of the model, to define the windows. Lightscape uses those to accurately calculate skylight and sunlight, which is the only light we have in this scene. As you might have noticed, my material naming convention is not what would be very common. This is for good reason, as Lightscape works very different from Lightwave in this regard, and I found this to be the best way.
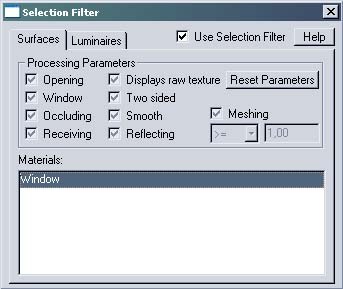
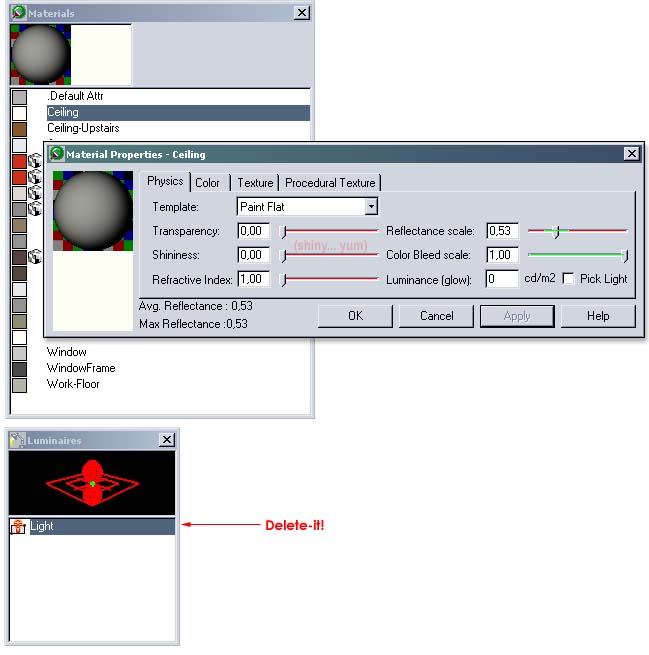
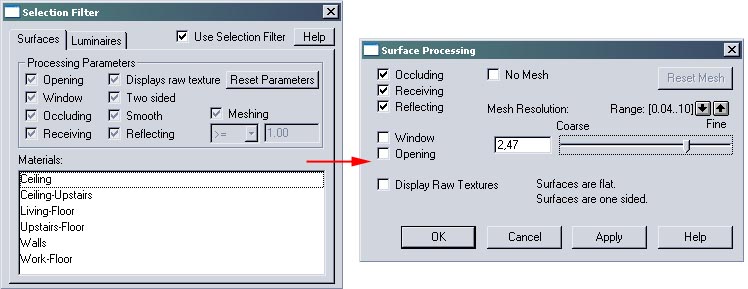
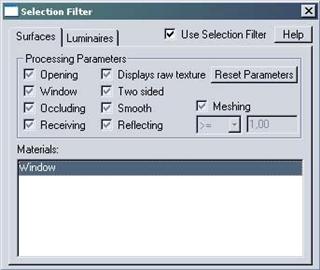
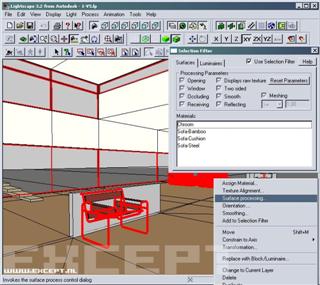
The materials in the scene are assigned according to object, and not according to surface properties. For instance, I could have had a surface called 'Plaster', and made both the ceiling and the wall out of it. However I have chosen to make a material called 'Ceiling', and one called 'Wall'. This is so that I can select them separately from each other in Lightscape. In the screenshot you see the right-click menu of the material table in Lightscape. Here I am adding the material 'Window' to the selection filter, in order to assign it Window status in Lightscape in the next step. Say that this would be a different scene with a glass table in it. If I would just have the material 'Glass', and both the windows and the table would be made from it, we would have a problem, since the glass table is not to emit sun and skylight, but its hard to select them apart from each other.
For now add the material Window to the selection filter.
|
 |
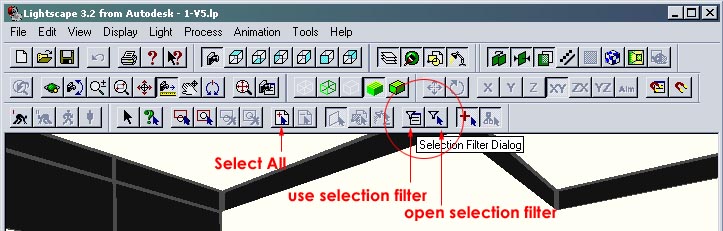
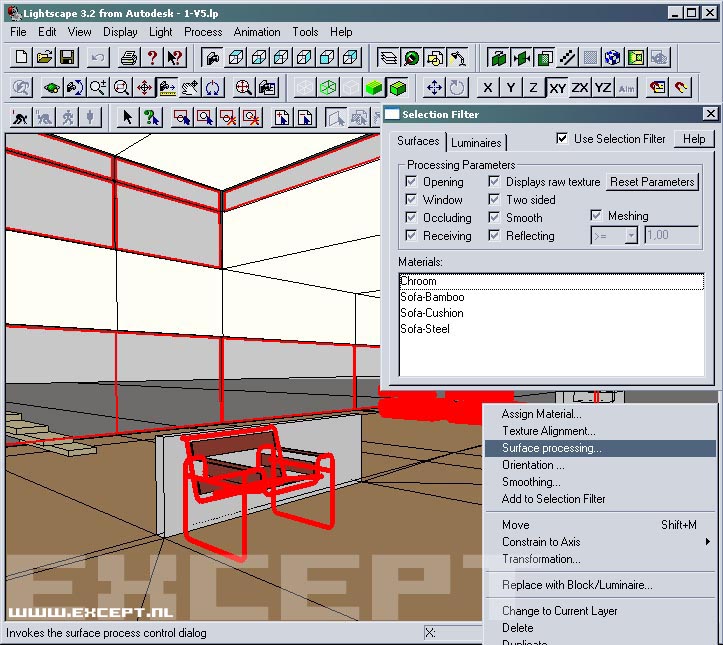
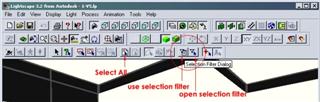
The Selection filter is a very handy tool in Lightscape. You use it to select faces according to a list of one or more materials. It will come in handy throughout this project. First we need to turn the selection filter on, so that when 'Select All' is pressed, the filter is applied. Also we should open the selection filter window. Press those two buttons on the interface to accomplish this.
|
 |
Here is the Selection Filter Window. Double click on an entry to remove it from the list, or right click and remove one or all from it. Ok Enough on the filter allready. Make sure 'Use Selection Filter' is on, and press the 'Select All' button from the previous image.
|
 |
Notice the windows having a red selection border around them. Right click somewhere in the main view and select 'Surface Processing'.
|
 |
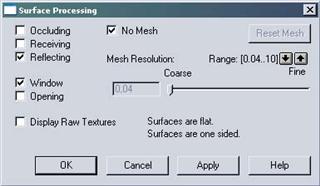
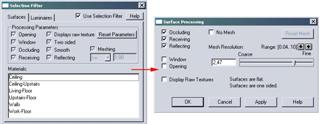
In the dialog box that pops up, for the windows, turn off Occluding and Receiving and turn on the 'Window' property. Also make the windows have a fixed mesh by selecting the 'No Mesh' box. This is a real calculation time saver. Glass consists predominantly of reflection and transparency, and its diffuse properies ar eusually negligble. Therefore radiosity needs not to be calculated on the glass itself, hence the faces that are glass need not to be subdivided by lightscape to get smooth radiosity effects. Therefore we can turn on the 'No Mesh'. I always turn on 'No Mesh' for models that are very complex as well. For instance a high poly-count vase or chair, that is subdivided by itself enough as it is get the 'No Mesh' treatment. It will still fully function in the solution, it will just not be subdivided. This also comes in handy when importing the solution into Lightwave later through the plugin method, as the old Lightwave import plugin cannot handle objects with many vertices.
|
 |
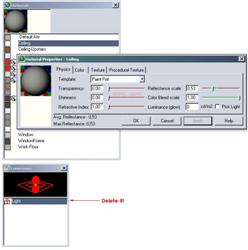
Now its time to set the properties of the materials. Don't do this in Lightwave, as its of no use, they don't get properly exported, as the material systems are too different. Setting them up in Lightscape first, and tweaking the in Lightwave later on is much better
I won't go into details about the material editor of Lightscape, I'll just say that you need to adjust each material, make sure a 'Template' drop down list item is selected for each and every material in the scene, and the reflectance scale is in the green area. Eventhough not all materials imagineable are listed in the Template list, I havn't found one that I couldnt compare to something else. Leather for instance could be seen as plastic or fabric, skin could be fabric or Ideal Diffuse with tweaked properties, and so on. If you want to blame someone for not having enough to choose from in that tmeplate list, write an angry letter to autodesk. In the meantime, ask them if they'll start selling Lightscape again.
Anyway... : )
You've got your work cut out for you. Once you get the hang of it, it goes really quickly to set up the materials. Play with the colors a bit, and try out the 'Texture Average' button for color. Quite handy.
While we're at it, delete the area light in the Luminaires panel, that managed to survive the Lightwave to Lightscape port afterall. We won't be needing it.
|
 |
Because you will often find yourself going back and forht between lightwave and lightscape, to adjust the geometry, perhaps add some models and so forth, you will lose your materials each time you import something new. It is good habit of saving all materials once you adjusted them all, because you can easily load them in over and over again. This is a real time saver. Also, saving out your scene parameters is a good idea when your scene is setup.
|
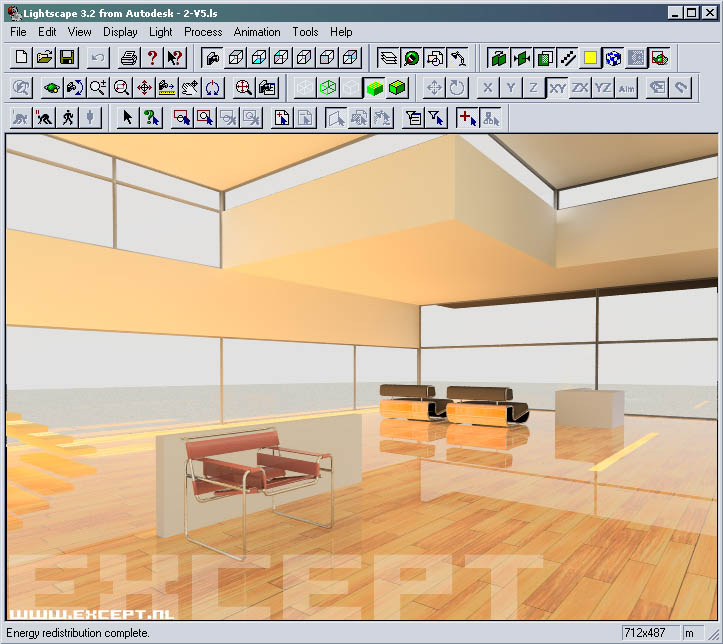
In my case, the scene now looks like this after all materials have been edited. This is with the textures turned off.
Time to set the project parameters.
|
 |
In my case, the scene now looks like this after all materials have been edited. This is with the textures turned off.
Time to set the project parameters. Just use the Wizard button and select quality 3 or 4, and 'Daylight through windows and openings only'.
|
|
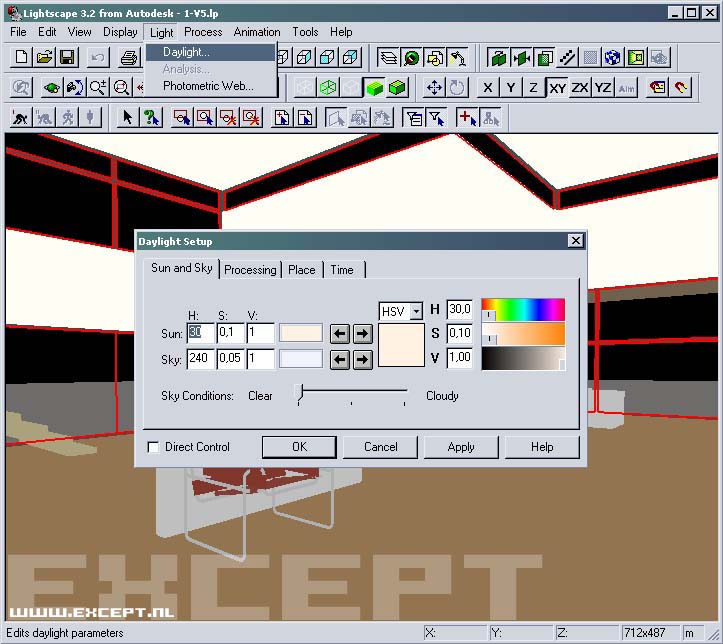
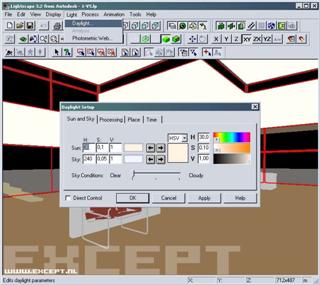
Now set up the daylight properties of the scene. For best results if you don;t know what you're doing, leave everything on the first two tabs alone, and just set your time and place. Make sure the norht point is pointing the right way (check by looking through the 'top' viewport where the north of the cad model is, and point the North point according to what is should be). I usually prefer the 'Direct control' option though. It replaces the place and time options with a direct way to set the sun.
Make sure the sun has proper luminance (not 0), then apply the settings.
|
 |
Now for some final touches. Set the materials of some of the more complex objects to 'No Mesh', as explained before. I have made the following material 'No Mesh': Chroom, Sofa-Bamboo, Sofa-Cushion, sofa-Steel. I also made the background color white, via the File > Parameters panel.
|
 |
One last thing. In a scene there are always important and less important areas. I like to give the important areas a bit more detail. Also, large planes will subdivide just as much as small planes, and therefore their resolution will be less than their smaller counterparts. Therefore I usually give large planes and important areas an increased Mesh Resolution. Using the selection filter to select the planes and areas you want to increase, you go into the same panel where you set the No Mesh parameter (Surface Processing), and slide the Mesh resolution bar to the right. A value of 2.5 will make the selected planes subdivide 2.5 times more than one which has it set on 1 (the default).
|
 |
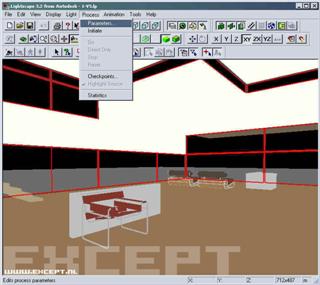
Ooh it's time to press... INITIATE!
The single most dangerous button of the entire program... with such a cute person on it that wants to be a frog. Once you press this button, your Lightscape preparation will cease to be, and your lightscape solution will be brought into life. This means that there are a number of things you can suddenly no longer change. Always save your preparation file well. Be carefull, you really can't go back.
Ok. You can press it now. I know you are scared. You should be, but radiosity is waiting for us at the other end of the man who wants to be a frog.
|
 -> ->
 |
That went easy. Now your scene is all black. Don't dispair, this is all part of the plan. Light will come from darkness. Since we have nothing to do in the solution stage without a solution, we might as well go ahead and press the third button... yaay... let's start running.
|
|
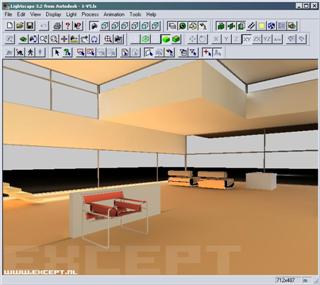
And this is what we get after 15 minutes or so (on a P4 2.2 Ghz). Some Lightscape installations have the nasty habit of corrupting your solution at a certain point (with me its usually enormous black areas in the solution, and something like '#QH' as a percentage indicator in the bottom left). It is therefore adviseable to occasionally stop the calculation of your solution (with the man who looks like he wants to be a tree), and save it, and then continue again.
One of the great strengths of Lightscape is that you can change a lot of paramters without having to recalculate your solution. Material properties for instance can be changed, and then after only a little bit of extra calculation, it has implemented the changes into your scene. Nifty.
Notice my sloppy modeling on the bottom left, where the small wall hits the ground. Eugh. I should have known better. However, because it is a textured floor, it won't matter that much. It will be hard to see.
|
|
Setting up the raytrace in Lightscape involves only a few small steps usually. In Display > Ray Trace Area Options you set the tracer to trace Direct Light, soft Shadows from sun, the AA setting to something like 4, and 10 bounces, and you get the following image in under one minute on a P4 2.2Ghz.
Very nice, but not good enough. Firstly the renderer makes a lot of errors. Not evident in this example, but small black specs are common in the images. also, there is hardly any control over anything. The sunlight on the floor looks weird where it intersects the reflecting floor. In my case, Lightscape rendered the Breuer chair's leather bands all black. It didn't like the image files I suppose. And there are more problems. Time to shift it over to Lightwave. This all will be handeled in Part III and IV of the tutorial.
Back to Part I
To Part III - Importing using the LS Importer for LW
To Part IV - Importing into LW using Vertex Maps
To the Except Website
|

 |
If this tutorial proves especially handy for you, would like to support the creation of more of these tutorials and new developments, or would just like to express your thanks, you can make a donation by clicking on the following button, or alternatively just send me an email.
|
|