|
To take the Lightwave objects we created in the previous parts of the model and use Surface Baker to bake the lighting solution into Image maps as opposed to Vertex Maps, and then optimize the tessellated model that came from Lightscape
- Lightwave v6 or above (preferably 8.2)
- QemLoss3 (Free plugin, get it here)
The vertex maps give us everything we need in order to render the solution as it stands. Usually we don't need to bake the solution to image maps at all, it only takes us time and effort to do so, and potentially degrades the image quality. The solution will hardly render any faster. However when we for instance want to make a VRML walk through, or any other kind of real-time application, its usually best to bake the maps to prevent differences in viewing applications to mess with the vertex maps versus the applied textures (if they can handle it at all).
A second reason for baking the images is that after the images are applied to the model the excessive tessellation of the model is no longer necessary, and we can start optimizing the model, to gain even more speed, and regain some control over the model. Also, image maps are easier to manipulate than vertex maps and therefore if there needs to be tweaking of the GI solution or the textures or something, it can be easily done in Photoshop or an equivalent program.
Microwave is expensive. Not everyone can afford it. Other than that, this method has no advantages. Its actually a great deal less good than the Microwave method, where we get an optimized model and faster and easier baking without compositioning.
|
Download the Lightwave scene from Part IV here. (ZIP 2.6 Mb)
This scene was made in Part IV of the tutorial, and contains the converted Lightscape model, using vertex maps for illumination.
Open the scene in Layout, and then open the model in Modeler. Look in the Uv textures list. You see a number of UV textures, some called 'Object_0000x' and some have a proper name. The ones with a proper name were made by me by selecting the surfaces with the Polygon Statistics Panel (shortcut: 'w'), and then making a Uv map with either planar or Atlas coordinates.
All the objects already have a UV map, which came from Lightscape originally. They are a bit strange though, and are usually out of UV range. I therefore prefer to make new ones. You can also just adjust the old ones.
If anyone ever finds out a way to properly optimize Uv maps in modeler using a packing method of some kind, I'd be very happy to know about it. |
 |
Be aware that you will get better results when you optimize your UV maps. Going beyond 2048x2048 for textures usually makes for heavy loads on a computer, especially in Real Time applications. Making several 2048x2048 image files are therefore preferable to one big one. Create your UV coordinates wisely, and preferably per surface. This makes for easy tweaking of the images later on, when you for instance want to change the color of the floor, but not of the wall.
|
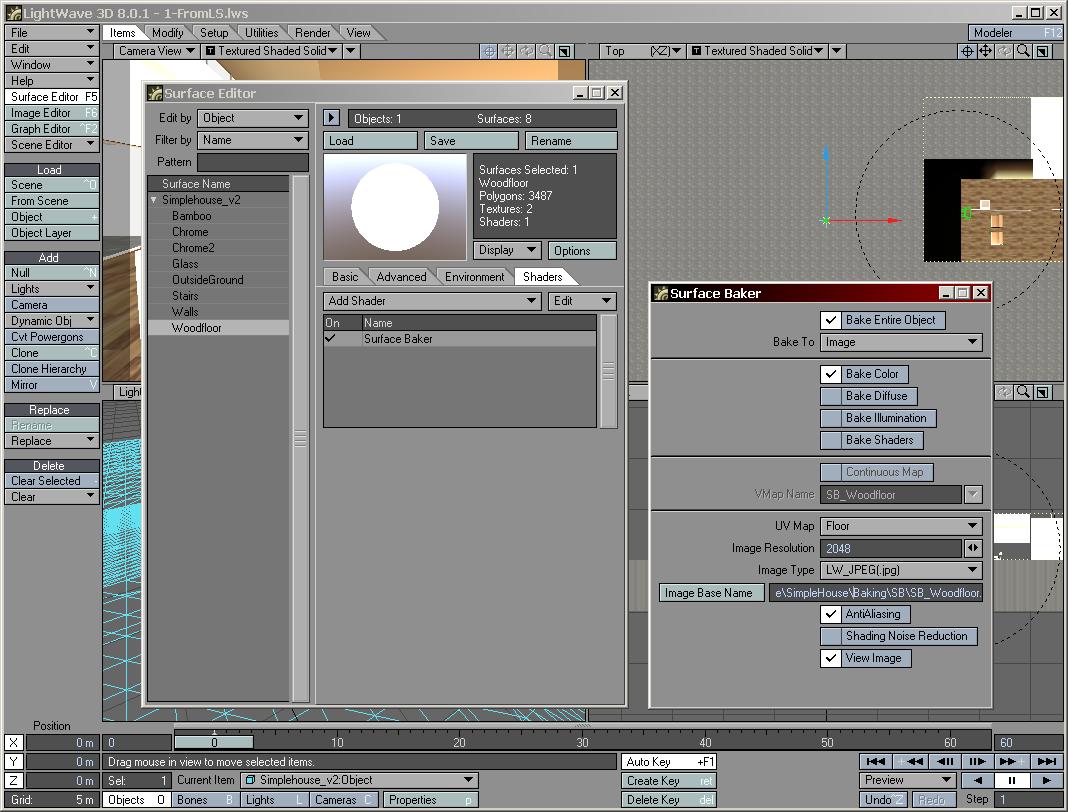
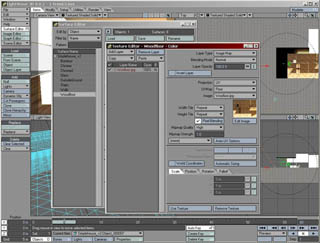
Swap back to Layout, and go to the Surface Editor. Select a surface of the mode, for instance the WoodFloor surface, and go the the 'Shaders' Tab.
Here, Add the shader 'Surface Baker', and enter its properties. You will need to set the Surface shader to 'Image' mode. Select 'Bake Entire Object.
Now we have a slight problem. since this is not a regular Lightwave object, SB has problems baking it properly the way it is rendered. Why there is no such thing as 'Bake Render Output' as in MicroWave in Surface Baker is beyond me.
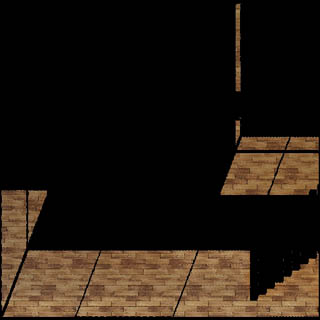
When we use Surface Baker using the switches 'Color', 'Diffuse' and 'Illumination', all the areas where no direct illumination is present will remain black (fig. 1). So instead of this channel being Additive, it does not composite at all.
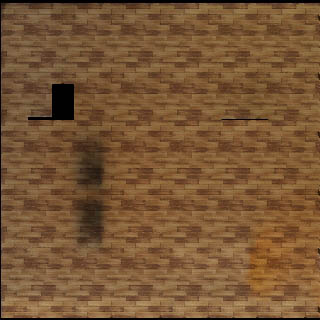
When we use only the switch 'color', we get an image such as in Fig. 2, which does contain all the GI solution information but not the direct light from the sun.
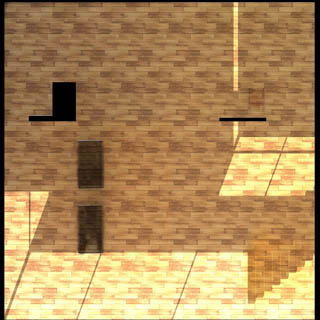
To get the whole of the information out of the model we have to Bake the surface twice, and compose them in some program, such as photoshop, to get the end result (fig. 3).
To recapulate, we need two render passes for each UV map we made, one using only the switch 'Bake Color, and one using 'Bake Color' and 'Bake illumination'.
I always use 'AntiAlias', as it is a shame not to do so for the little time extra.
The Baking should go reasonably quickly. |
 |
 |
 |
| Fig. 1 , Baked WoodFloor using 'color' and 'illumination' |
Fig. 2 Baked WoodFloor using only 'color' |
 |
|
| Fig. 3 , WoodFloor image after compositing |
|
|
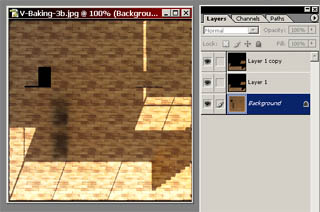
Open your favorite Image Editing program. I have used Adobe Photoshop.
Now, the image to the right shows the settings I used to combine the two baked images of the floor into one image that looks like its the rendered output.
The top Layer has the blending type set to 'Linear Dodge' and the Opacity set to 50%, the second layer has also go the blending type on 'Linear Dodge', but 100% Opacity. The background layer is just standard.
If you want you could make a Photoshop action out of this.
Save out the image, and repeat the entire process for all the Uv mapped surfaces. For this model you will end up with the following textures:
Floor, Walls, Stairs, Chrome, Chrome2, Bamboo, Rest.
We will skip making a map for OutsideGround and the Glass.
I see you thinking that this doesn't make sense. Since for instance the UV map ReSt spans several surfaces like Chrome, Bamboo and such, they should be included into one map. And I agree. Its just that since the objects are actually physically separated from each other, Surface Baker doesn't bake the other surfaces into the map. There is no solution for this, another nasty thing about Surface Baker. This will leave you to either manually adding the different sections of the different maps into one, which will save memory, or just using a different texture for each surface.
I have chosen to combine Chrome, Chrome2 and Bamboo into one map.
Note: This step is eliminated by MicroWave. |
 |
In Layout, replace or add the textures you just created using the baking and compositing steps to each material. You can now also turn off the Vertex Map in the advanced tab.
Once you applied each texture to each material, you have successfully baked the direct lighting combined with the vertex maps into the textures.
We still have the tessellated model though. In order to gain some speed with large projects, we're going to try to temper the polycount a little. |
 |
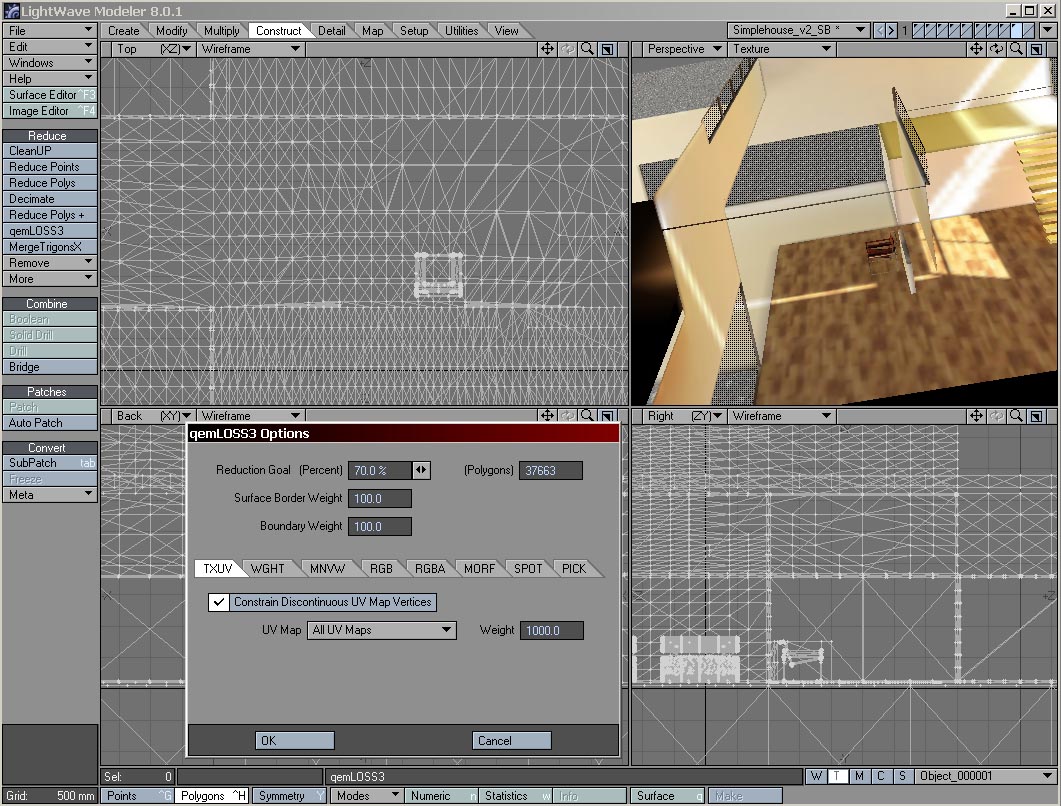
For this part you will need QemLoss3. It is a free plugin for modeler and an update to the existing ReducePolygons+ command. QemLoss3 retains the UV coordinates of the model.
You can get QemLoss3 here.
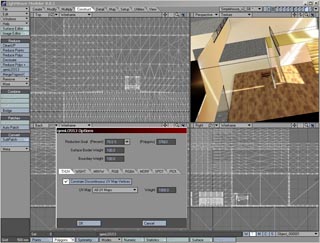
Send the model to modeler, and start QemLoss3.
You might want to experiment with the settings. A Setting of 70% in the reduction Goals worked good for me. Also check the 'Constrain Discontinuous UV Map Vertices' option.
As you can see, this is not an ideal way for reducing your model. It works but you will probably get some errors here and there. It also works to manually reduce the model, and using the UV map view helps to select large planes of planar poly's in one go, and merging them with shift-z. This is very cumbersome though.
If you want to really properly get back to the original Lightwave model with the textures applied, you will need to use the method describes in Part VI of this tutorial, using the Microwave plugin that needs to be bought. |
 |
If this tutorial proves especially handy for you, would like to support the creation of more of these tutorials and new developments, or would just like to express your thanks, you can make a donation by clicking on the following button, or alternatively just send me an email.
|
|