Home
Contact
About
 
 
  LightWave to LightScape to LightWave Guide


This tutorial consists of several parts:


To support the further development of this and other guides please donate so I can buy cheese and such.

paypal

Tom Bosschaert, MSc, MArch
July-14-2008


What do you need?

  • Lightwave v6 or above (preferably 8.2)
  • Lightscape v3.0 or higher (preferably 3.2)
  • Accutrans 3D (Only for Part IV of the tutorial, read step VI-3a to see why)


Tutorial Introduction

Object of this tutorial:

In Part I of this tutorial (this page) we'll have a general overview of the project and talk about preparing and converting your scene to Lightscape.

In Part II of this tutorial we will take a sample scene I made into Lightscape and go through the entire process of setting its properties, durfaces and parameters for calculation. We will end up with a Lightscape Solution file.

In Part III of this tutorial you can see how to import your Lighscape solution using the already known but slightly broken and very tedious way through the Lightscape Importer.

In Part IV of this tutorial you can see an alternative, and in my opinion superior, way to import your Lightscape solution into Lightwave v8.


You will be making this:


Rendertime: 29.6 seconds (P4, 2.2Ghz)
800x600, Low AA


What do you need?

  • Lightwave v6 or above (preferably 8.2)
  • Lightscape v3.0 or higher (preferably 3.2)
  • Accutrans 3D (Only for Part IV of the tutorial, read step VI-3a to see why)

Why were we doing this again?

Lightscape is old. It is discontinued. It is now owned by Autodesk (responsible for killing it). Its user interface is the worst ever. It doesn't support anything but ancient CG standards. Why bother using it, is what many people ask.
The answer lies in the absolute innovative and unique way Lightscape approaches radiosity rendering. It is a scientific package so everything calculated in Lightscape is an attempt at a real world analysis. This means that although you can set things like resolution of the calculation and so forth, you will always get a scientific sound result. There's no messing with its physics, which, for architecture visualization for instance, is a very good thing. Lightscape uses adaptive tessellation to calculate lighting on a per vertex basis. it distributes light with precedence to areas with high energy content, and therefore it spends more time in important areas than in unimportant areas. This means that usually you get a full 3d radiosity solution, stored in a file, in a timeframe that no other renderer can beat.

The downsides of lightscape are evident too. It places great importance on 'neat' modeling, which is an acquired skill and can furiate beginning users not aware of these requirements. Also, although its radiosity calculation is fantastic, its actual renderer is very old. It doesn't even support bump mapping. Therefore getting it into another 3d package with a modern renderer is usually the only way to get proper renders out of a lightscape solution.

In this tutorial I will cover a very wide field of using Lightscape in combination with Lightwave. I have extensive experience with Lightwave and Lightscape, and the possible interfaces between them. It took me several months of intense searching and trial-and-error to get all the information that is present here in this tutorial. I have found many problems on the way, and developed solutions for most of them, but none is perfect. I have to thank Wayne Hogue of Micromouse software for his willingness to adapt some parts of his 3d translator program Accutrans 3D to fill in what for me is the most interesting and solid process of getting a Lightscape Solution (from hereon called a 'LS') into lightwave.

It might be interesting to investigate the workflow of this method using the following graph (click for a readable version):

Workflow


Part I - Importing your Lightwave v8 models into Lightscape


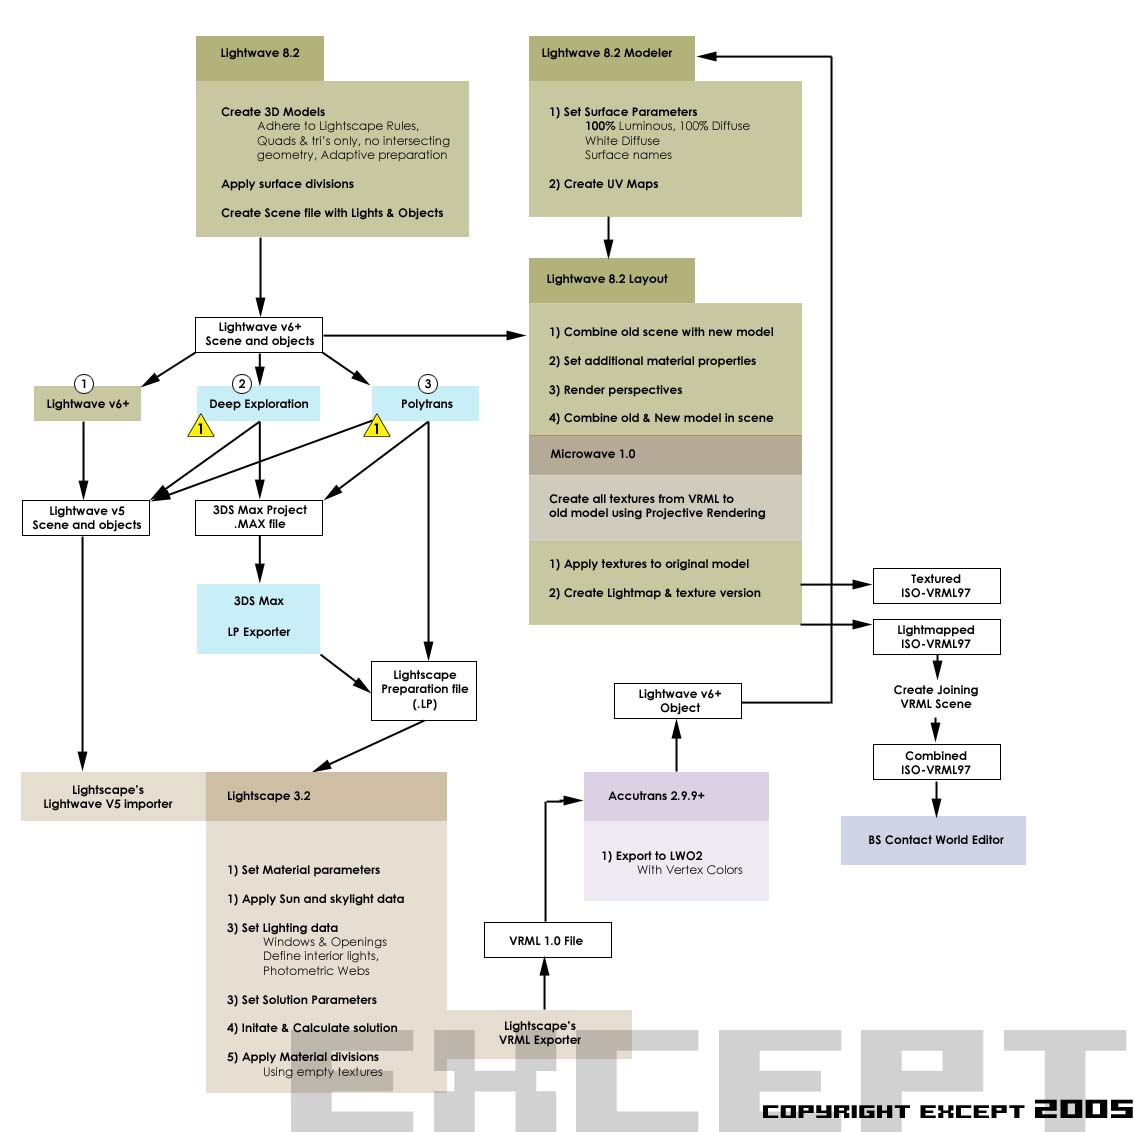
There are several ways to import a Lightscape model into Lightwave. Each method can branch of into another on specific key points. The object is to choose the right one for your purpose (and your wallet).

First I will cover shortly how to get your scene into Lightscape in the first place. I will cover this rudimentary for now, and will expand on this section when I have more time.

Lightscape has a Lightwave importer. This importer reads only lightwave 5 scene files and objects. A great shortcoming of it is that most of the time it doesn't import the lights present in the scene. Although they can be added in lightscape itself, it is a tedious and very time consuming task that you want to avoid with complex scenes. However the lightwave importer is usually the way to go for normal scenes.

These are the import paths I have tried:
(reference to Lightwave 5 assumes lightwave v5.6, and when I say 'v6+' this means objects, scenes and versions of lightwave v6 and above, which is a whole different format)

Method (1)

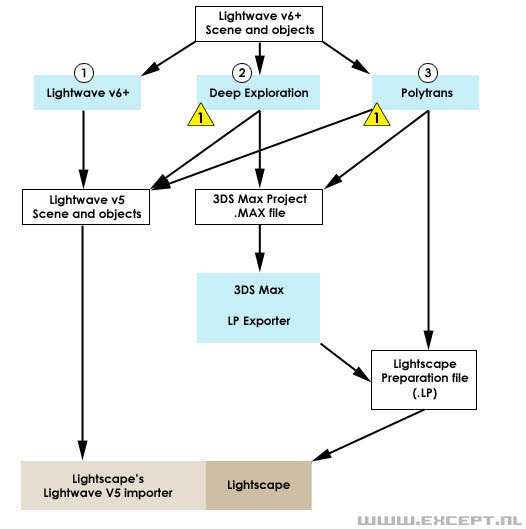
  • LW objects -> LW v5 objects using modelers export to V5
  • Replace all the objects in your scene with the V5 objects
  • save LW scene -> LW V5 scene
  • import into Lightscape (never mind the errors it gives you)
advantages:

No other programs needed but Lw and LS.
Object data is fully preserved, all materials are ported over correctly.
Most reliable conversion method.

disadvantages: Object positions are reset to their origin, so placement of objects needs to occur in modeler, not layout),
Lights are more often than not ignored by lightscape.


Method (2)

  • Lw V6+ scene -> Deep exploration -> 3ds Max format
  • 3ds max v4 -> Lightscape Preparation format (.lp)
advantages: position of objects placed and cloned in layout will be preserved. Lights will be correctly ported.
disadvantages: pricey. but if you have these programs you can give it a shot.
(!) Objects can be corrupted, materials do not always survive the port.


Method (3)

  • Lw v6+ scene -> polytrans -> Lightscape preparation format
advantages: position of objects placed and cloned in layout will be preserved. Lights will be correctly ported.
disadvantages: polytrans is pricey.
(!) Object and material corruption is almost inevitable.


Please note that there are other paths one can follow in the diagram, and there are many other possible programs out there which can help you convert your scene. I have found just using the Lightwave conversion to V5 way is usually enough. Occasionally I convert the scene with method 2 so that I have the lights in Lightscape, which I save out, and then load in with the scene I made through method 1, to be sure the objects and materials are preserved well.

Now that we have our scene in Lightscape, do your stuff. Or alternatively, follow Part II of the tutorial, how you set up an example scene in Lightscape. For the majority of things which are necessary to adjust while still in lightscape to get the solution into lightwave properly, it is possible to change them after the solution has been calculated.

The main ways of importing your solution into Lightwave are treated in Part III and Part IV of this tutorial.

Go to Except Website

This tutorial is Copyright 2004 Except Design. Nothing from this website can be copied, transferred, published or distributed in any way without written consent from the author.


Links & other tutorials


If this tutorial proves especially handy for you, would like to support the creation of more of these tutorials and new developments, or would just like to express your thanks, you can make a donation by clicking on the following button, or alternatively just send me an email.


Go To Presentation Resources page


Go to Except Website

This guide is Copyright 2008 Except Design, and written by Tom Bosschaert. Nothing from this website can be copied, transferred, published or distributed in any way without prior written consent from the author.